Install Repcached (Memcached Replication) For High-Availability
09 Dec 2011When you have a dynamic website which handles lots of user queries, as a Web Master my top priorities are to keep the site up and running with minimum downtime (I meant 0 downtime) and to keep the site healthy to response back to users in very very short time.
So, keeping those 2 main tasks in my mind, I was able to track down the problem which was haunting for sometimes.
It was non optimized queries which ran through our WSO2 Developer Portal. Due to this issue, portal’s MySQL load was always high. So the answer was to reduce the MySQL load.
I used Memcached to minimize database load. Memcached increases the performance and scalability of dynamic MySQL-driven websites by caching data and objects in memory.
Setting up Memcached is fairly simple. You can Install using APT (Debian based) or [download the tar and compile it on the server]
After Installing Memcached with MySQL, it gave a good performance boost to our Developer Portal until a node’s cache got expired.
I noticed that some users couldn’t upload / attach files to OR Forum or new article. After some series of testing and debugging sessions, I was able confirm that we had a problem in Memcached while accessing in a cluster enviroment.
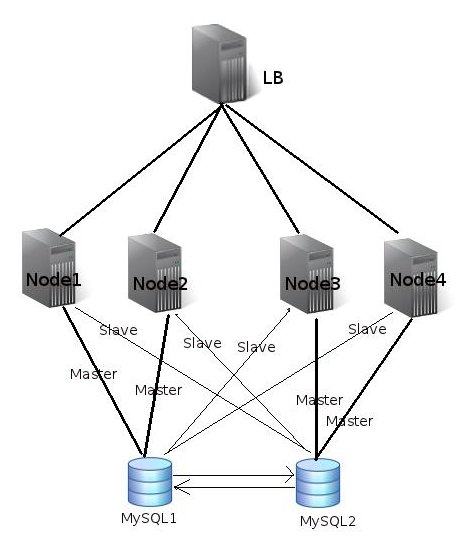
The reason was : Lets’ say when users are accessing the site in a peak time, first request is severed from node1. Then the second request gets routed to node3 or Node4 ([backup nodes] (http://www.pitigala.org/2011/12/drupal-scaling-and-performance-tuning.html)) due to high load in the cluster, User Drupal can not access cache objects created during the first request. Because of that, user receives lots of unexpected results.
Then I Installed RepCached to support Replication in Memcached. Repcached helps to keep redundancy memcached system and that was the solution I was looking for.
####Installing RepCached
- Download the Latest version of repcached from http://repcached.lab.klab.org/
- Install some extra packages on Debian (apt-get install libevent-dev g++ make)
- Install repcached from tar
- Extract files (tar xvf memcached-1.2.8-repcached-2.2.tar)
- go to the directory (cd memcached-1.2.8-repcached-2.2/)
- Enable replication before install (./configure –enable-replication)
- Install (make && make install)
####Configure repcache
- create the file (vim /etc/memcachedrep)
- Create the init Script (vim /etc/init.d/memcachedrep)
- chmod +x /etc/init.d/memcacherep
- update-rc.d memcachedrep defaults
default configuration (
/etc/memcachedrep)
## extra commandline options to start memcached in replicated mode
# -x < ip_addr > hostname or IP address of the master replication server
# -X < num > TCP port number of the master (default: 11212)
DAEMON_ARGS="-m 128 -p 11211 -u root -P /var/run/memcachedrep.pid -d -x 10.100.1.10"
init script (
/etc/init.d/memcachedrep)
#! /bin/sh
### BEGIN INIT INFO
# Provides:             memcached
# Required-Start:       $syslog
# Required-Stop:        $syslog
# Should-Start:         $local_fs
# Should-Stop:          $local_fs
# Default-Start:        2 3 4 5
# Default-Stop:         0 1 6
# Short-Description:    memcached - Memory caching daemon replicated
# Description:          memcached - Memory caching daemon replicated
### END INIT INFO
# Author: Marcus Spiegel <marcus.spiegel@gmail.com>
#
# Please remove the "Author" lines above and replace them
# with your own name if you copy and modify this script.
# Do NOT "set -e"
# PATH should only include /usr/* if it runs after the mountnfs.sh script
PATH=/sbin:/usr/sbin:/bin:/usr/bin
DESC="memcachedrep"
NAME=memcached
DAEMON=/usr/local/bin/$NAME
DAEMON_ARGS="--options args"
PIDFILE=/var/run/memcachedrep.pid
SCRIPTNAME=/etc/init.d/$DESC
VERBOSE="yes"
# Exit if the package is not installed
[ -x "$DAEMON" ] || exit 0
# Read configuration variable file if it is present
[ -r /etc/default/$DESC ] && . /etc/default/$DESC
# Load the VERBOSE setting and other rcS variables
. /lib/init/vars.sh
# Define LSB log_* functions.
# Depend on lsb-base (>= 3.0-6) to ensure that this file is present.
. /lib/lsb/init-functions
#
# Function that starts the daemon/service
#
do_start()
{
	# Return
	#   0 if daemon has been started
	#   1 if daemon was already running
	#   2 if daemon could not be started
	start-stop-daemon --start --quiet --pidfile $PIDFILE --exec $DAEMON --test > /dev/null \
		|| return 1
	start-stop-daemon --start --quiet --pidfile $PIDFILE --exec $DAEMON -- \
		$DAEMON_ARGS \
		|| return 2
	# Add code here, if necessary, that waits for the process to be ready
	# to handle requests from services started subsequently which depend
	# on this one.  As a last resort, sleep for some time.
}
#
# Function that stops the daemon/service
#
do_stop()
{
	# Return
	#   0 if daemon has been stopped
	#   1 if daemon was already stopped
	#   2 if daemon could not be stopped
	#   other if a failure occurred
    start-stop-daemon --stop --quiet --retry=TERM/30/KILL/5 --pidfile $PIDFILE --name $NAME
    RETVAL="$?"
    [ "$RETVAL" = 2 ] && return 2
	# Wait for children to finish too if this is a daemon that forks
	# and if the daemon is only ever run from this initscript.
	# If the above conditions are not satisfied then add some other code
	# that waits for the process to drop all resources that could be
	# needed by services started subsequently.  A last resort is to
	# sleep for some time.
	start-stop-daemon --stop --quiet --oknodo --retry=0/30/KILL/5 --exec $DAEMON
	[ "$?" = 2 ] && return 2
	# Many daemons don't delete their pidfiles when they exit.
	rm -f $PIDFILE
	return "$RETVAL"
}
#
# Function that sends a SIGHUP to the daemon/service
#
do_reload() {
	#
	# If the daemon can reload its configuration without
	# restarting (for example, when it is sent a SIGHUP),
	# then implement that here.
	#
	start-stop-daemon --stop --signal 1 --quiet --pidfile $PIDFILE --name $NAME
	return 0
}
case "$1" in
  start)
	[ "$VERBOSE" != no ] && log_daemon_msg "Starting $DESC" "$NAME"
	do_start
	case "$?" in
		0|1) [ "$VERBOSE" != no ] && log_end_msg 0 ;;
		2) [ "$VERBOSE" != no ] && log_end_msg 1 ;;
	esac
	;;
  stop)
	[ "$VERBOSE" != no ] && log_daemon_msg "Stopping $DESC" "$NAME"
	do_stop
	case "$?" in
		0|1) [ "$VERBOSE" != no ] && log_end_msg 0 ;;
		2) [ "$VERBOSE" != no ] && log_end_msg 1 ;;
	esac
	;;
  #reload|force-reload)
	#
	# If do_reload() is not implemented then leave this commented out
	# and leave 'force-reload' as an alias for 'restart'.
	#
	#log_daemon_msg "Reloading $DESC" "$NAME"
	#do_reload
	#log_end_msg $?
	#;;
  restart|force-reload)
	#
	# If the "reload" option is implemented then remove the
	# 'force-reload' alias
	#
	log_daemon_msg "Restarting $DESC" "$NAME"
	do_stop
	case "$?" in
	  0|1)
		do_start
		case "$?" in
			0) log_end_msg 0 ;;
			1) log_end_msg 1 ;; # Old process is still running
			*) log_end_msg 1 ;; # Failed to start
		esac
		;;
	  *)
	  	# Failed to stop
		log_end_msg 1
		;;
	esac
	;;
  *)
	#echo "Usage: $SCRIPTNAME {start|stop|restart|reload|force-reload}" >&2
	echo "Usage: $SCRIPTNAME {start|stop|restart|force-reload}" >&2
	exit 3
	;;
esac
:
####Test the repcached
In Server 1
telnet 127.0.0.1 11211
set foo 0 0 3
bar
In Server 2
telnet 127.0.0.1 11211
get foo #You will get bar as the Output